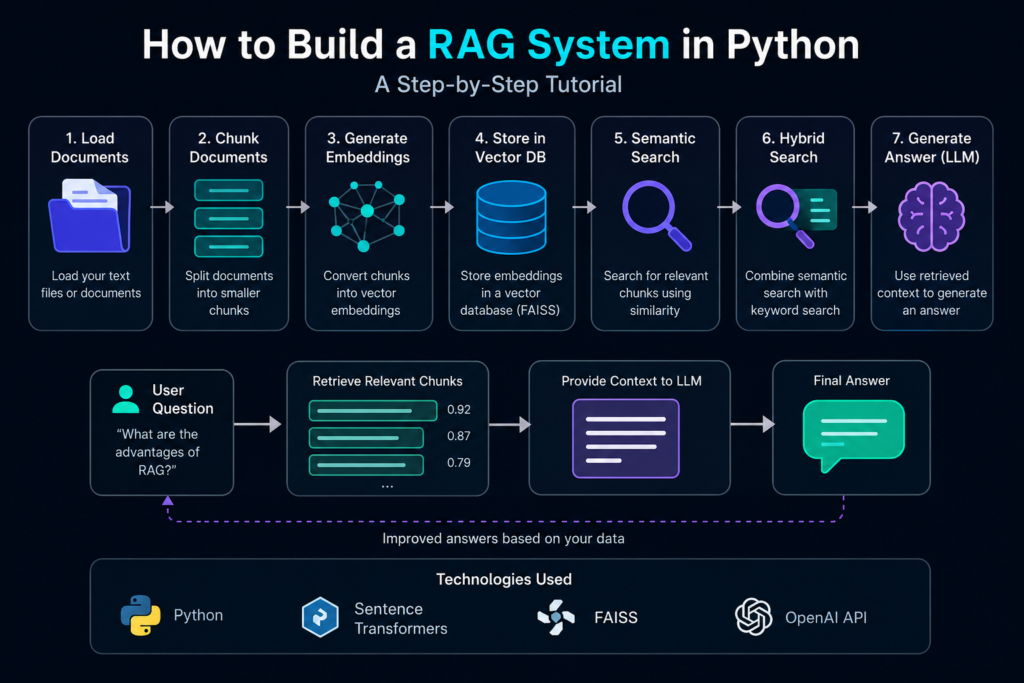
🚀 What You Will Build
In this hands-on tutorial, you will build a RAG system in Python from scratch.
Rather than focusing only on theory, we will implement each core component step by step and explain how they work together.
By the end of this guide, you will have a working retrieval pipeline capable of searching documents and generating AI-powered answers based on relevant context.
🧠 What You Will Learn
During this tutorial, you will build every major component of a modern RAG system, including:
- document loading
- document chunking
- embedding generation
- FAISS vector indexing
- semantic search
- optional hybrid retrieval
- LLM-powered answer generation
Each step builds on the previous one, creating a complete end-to-end retrieval pipeline.
🛠 Technologies Used
This tutorial uses lightweight and widely adopted Python libraries, including:
- Python
- sentence-transformers
- FAISS
- OpenAI API
- NumPy
The goal is to demonstrate the core ideas behind RAG without relying on large frameworks or unnecessary abstractions.
📚 What You Should Already Know
This guide assumes a basic understanding of Python programming.
If you are new to Retrieval-Augmented Generation, you may find these articles helpful before continuing:
These concepts are used throughout the implementation.
🎯 What You Will Build
By the end of this tutorial, your application will be able to:
- load documents
- split them into chunks
- generate vector embeddings
- build a FAISS index
- retrieve relevant information
- generate answers using an LLM
By the end of this tutorial, you will successfully build a RAG system in Python that can load documents, generate embeddings, retrieve relevant context, and produce answers using a large language model.
🛠 Prerequisites
Before you build a RAG system in Python, make sure your development environment is ready. This tutorial uses a lightweight Python stack to demonstrate the core concepts of Retrieval-Augmented Generation without relying on large frameworks. The goal is to help you understand how each component works so you can later extend the project with additional features.
You should have Python 3.10 or later installed. Creating a virtual environment is recommended to keep project dependencies isolated.
Install the required libraries:
pip install sentence-transformers faiss-cpu openai python-dotenv numpyNext, create a simple project structure:
rag-project/
│
├── documents/
│     sample.txt
│
├── main.py
├── requirements.txt
└── .env
The documents folder will store the text files that our RAG system will index and search.
Create a .env file and add your OpenAI API key:
OPENAI_API_KEY=your_api_key_hereUsing an environment file keeps sensitive credentials separate from your source code and makes the project easier to deploy.
Throughout this tutorial we will implement the complete retrieval pipeline using:
- Python
- sentence-transformers
- FAISS
- OpenAI API
- NumPy
Each library has a specific purpose. Sentence Transformers generates vector embeddings, FAISS performs fast similarity search, OpenAI generates answers from retrieved context, and NumPy provides efficient numerical operations.
By the end of this tutorial you will have a working RAG application capable of loading documents, splitting them into chunks, generating embeddings, building a FAISS index, retrieving relevant information, and producing answers with a large language model. After completing this setup, you are ready to build a RAG system in Python step by step, starting with document loading and ending with AI-powered answer generation.
📂 Step 1 — Load Your Documents
The first step when you build a RAG system in Python is loading the documents that will serve as the knowledge base.
For simplicity, this tutorial uses plain text files stored inside a documents folder. Later, you can extend the same approach to PDF, Word, HTML, or database records.
Create a simple document loader:
from pathlib import Path

def load_documents(folder_path):
    documents = []

    for file in Path(folder_path).glob("*.txt"):
        text = file.read_text(encoding="utf-8")

        documents.append({
            "filename": file.name,
            "content": text
        })

    return documents
Load the documents:
documents = load_documents("documents")
print(f"Loaded {len(documents)} documents.")
If your documents folder contains three text files, the output will look similar to:
Loaded 3 documents.At this stage, every document is stored as a Python dictionary containing the filename and its content.
Example:
{
    "filename": "sample.txt",
    "content": "Retrieval-Augmented Generation combines search with LLMs..."
}
Although this example is intentionally simple, the same idea is used in production RAG systems. The only difference is that documents are usually loaded from PDFs, databases, cloud storage, or enterprise knowledge bases instead of local text files.
In the next step, we will split these documents into smaller chunks so they can be embedded and retrieved more efficiently.
✂️ Step 2 — Chunk the Documents
After loading the documents, the next step is splitting them into smaller pieces called chunks.
Large Language Models work more effectively with smaller sections of text than with entire documents. Chunking also improves retrieval quality because the search system can identify the most relevant passage instead of returning a complete document.
If you would like a deeper explanation of chunking strategies, read our guide:
Chunking Strategies for RAG Systems
For this tutorial, we will use a simple fixed-size chunking approach.
def chunk_text(text, chunk_size=500, overlap=100):
    chunks = []

    start = 0

    while start < len(text):
        end = start + chunk_size
        chunks.append(text[start:end])
        start += chunk_size - overlap

    return chunks
Now let’s split every loaded document into chunks.
all_chunks = []

for document in documents:
    chunks = chunk_text(document["content"])

    for chunk in chunks:
        all_chunks.append({
            "filename": document["filename"],
            "text": chunk
        })

print(f"Generated {len(all_chunks)} chunks.")
Example output:
Generated 27 chunks.Each chunk keeps both the document name and the corresponding text.
Example:
{
    "filename": "sample.txt",
    "text": "Retrieval-Augmented Generation combines search with..."
}
In production RAG systems, chunking is usually more sophisticated. Developers often split documents by paragraphs, headings, or sentences while preserving semantic context. However, the simple approach used here is sufficient to understand the overall retrieval pipeline.
The next step is converting every chunk into a vector embedding so the system can perform semantic search.
🧠 Step 3 — Generate Embeddings
After the documents are split into chunks, the next step is converting each chunk into a vector embedding.
Embeddings are numerical representations of text. They allow the RAG system to compare meaning instead of relying only on keyword matching.
If you want to build a RAG system in Python, embeddings are one of the most important components because they make semantic search possible.
You can learn more about this concept here:
In this tutorial, we will use sentence-transformers to generate embeddings locally.
The library is maintained by Hugging Face and is one of the most widely used embedding frameworks for semantic retrieval.
Sentence Transformers Documentation
from sentence_transformers import SentenceTransformer
import numpy as np

embedding_model = SentenceTransformer("all-MiniLM-L6-v2")

chunk_texts = [chunk["text"] for chunk in all_chunks]

embeddings = embedding_model.encode(
    chunk_texts,
    convert_to_numpy=True,
    normalize_embeddings=True
)

embeddings = embeddings.astype("float32")

print(f"Generated embeddings with shape: {embeddings.shape}")
Example output:
Generated embeddings with shape: (27, 384)This means the system generated one embedding for each chunk. In this example, every chunk is represented as a vector with 384 dimensions.
The parameter normalize_embeddings=True is important because it prepares vectors for cosine similarity search. This makes it easier to compare how close different chunks are in meaning.
At this stage, we have:
- loaded documents
- split them into chunks
- converted each chunk into an embedding
The next step is storing these embeddings inside a FAISS index so we can search them efficiently.
🗄 Step 4 — Build a FAISS Vector Index
To build a RAG system in Python, the next step is creating a searchable vector index from the generated embeddings.
This is where FAISS comes in.
FAISS (Facebook AI Similarity Search) is one of the most popular vector search libraries. It is designed to perform extremely fast nearest-neighbor searches and is widely used in modern RAG applications.
If you want to learn more about vector indexing, read our guide:
Create a FAISS index:
import faiss

dimension = embeddings.shape[1]

index = faiss.IndexFlatIP(dimension)

index.add(embeddings)

print(f"Indexed {index.ntotal} document chunks.")
Example output:
Indexed 27 document chunks.The IndexFlatIP index performs similarity search using the inner product.
Because we normalized the embeddings in the previous step, the inner product becomes equivalent to cosine similarity, which is one of the most common similarity metrics in semantic retrieval.
At this point our RAG system contains:
- the original documents
- document chunks
- vector embeddings
- a searchable FAISS index
At this stage, you have completed one of the most important parts required to build a RAG system in Python. Your documents are now indexed and ready for semantic retrieval.
In the next step, we will implement semantic search by converting a user’s question into an embedding and retrieving the closest matching chunks from the FAISS index.
✅ Current Project Status
Congratulations! You have completed the core data preparation stage required to build a RAG system in Python.
Current progress:
- ✅ Documents loaded
- ✅ Documents split into chunks
- ✅ Embeddings generated
- ✅ FAISS vector index created
Your documents are now fully indexed and ready for semantic retrieval.
In the next step, you will build a RAG system in Python by implementing semantic search that retrieves the most relevant document chunks for any user query.
🔎 Step 5 — Implement Semantic Search
Now it’s time to build a RAG system in Python by implementing semantic search.
The idea is simple:
- Convert the user’s question into an embedding.
- Search the FAISS index for the most similar vectors.
- Return the corresponding document chunks.
This allows the system to retrieve information based on meaning instead of exact keyword matching.
If you would like to learn more about semantic retrieval, read our guide:
Create a search function:
def semantic_search(query, top_k=3):
    query_embedding = embedding_model.encode(
        [query],
        convert_to_numpy=True,
        normalize_embeddings=True
    ).astype("float32")

    scores, indices = index.search(query_embedding, top_k)

    results = []

    for score, idx in zip(scores[0], indices[0]):
        results.append({
            "score": float(score),
            "filename": all_chunks[idx]["filename"],
            "text": all_chunks[idx]["text"]
        })

    return results
Now test the retrieval:
query = "What is Retrieval-Augmented Generation?"

results = semantic_search(query)

for result in results:
    print(f"Score: {result['score']:.3f}")
    print(f"File: {result['filename']}")
    print(result["text"])
    print("-" * 60)
Example output:
Score: 0.892
File: sample.txt

Retrieval-Augmented Generation combines vector search with
large language models to improve factual accuracy...

------------------------------------------------------------
Notice that the retrieved chunk does not need to contain the exact words from the query. Instead, semantic search identifies content with similar meaning, which is one of the biggest advantages of embedding-based retrieval.
At this point, your application can already search documents intelligently. However, the retrieved text is still displayed directly to the user.
The final step is connecting an LLM so it can use the retrieved context to generate a natural language answer.
⚡ Step 6 — Add Hybrid Search (Optional)
Semantic search works well for many RAG applications, but it is not perfect.
Sometimes users search for exact terms such as:
- product names
- error codes
- API names
- model numbers
- software versions
In these cases, pure vector search may miss important keyword-based matches.
This is where hybrid search becomes useful.
Hybrid search combines semantic retrieval with keyword matching to improve both recall and precision.
If you want a deeper explanation, read our guide:
For this tutorial, we will add a simple keyword search function and combine it with semantic search results.
def keyword_search(query, top_k=3):
    query_terms = query.lower().split()
    results = []

    for i, chunk in enumerate(all_chunks):
        text = chunk["text"].lower()
        score = sum(1 for term in query_terms if term in text)

        if score > 0:
            results.append({
                "score": score,
                "filename": chunk["filename"],
                "text": chunk["text"],
                "index": i
            })

    results = sorted(results, key=lambda x: x["score"], reverse=True)

    return results[:top_k]
Now create a simple hybrid search function:
def hybrid_search(query, top_k=3):
    semantic_results = semantic_search(query, top_k=top_k)
    keyword_results = keyword_search(query, top_k=top_k)

    combined = {}

    for result in semantic_results:
        key = result["text"]
        combined[key] = {
            "score": result["score"],
            "filename": result["filename"],
            "text": result["text"]
        }

    for result in keyword_results:
        key = result["text"]

        if key in combined:
            combined[key]["score"] += result["score"]
        else:
            combined[key] = {
                "score": result["score"],
                "filename": result["filename"],
                "text": result["text"]
            }

    ranked_results = sorted(
        combined.values(),
        key=lambda x: x["score"],
        reverse=True
    )

    return ranked_results[:top_k]
Test hybrid retrieval:
query = "FAISS vector search"

results = hybrid_search(query)

for result in results:
    print(f"Score: {result['score']:.3f}")
    print(f"File: {result['filename']}")
    print(result["text"])
    print("-" * 60)
This implementation is intentionally simple.
Production systems usually use more advanced techniques such as BM25, weighted score fusion, reciprocal rank fusion, or re-ranking models.
However, this basic version shows the core idea clearly: combine keyword relevance with semantic similarity.
When you build a RAG system in Python for real-world documents, hybrid retrieval can improve results when users search with both natural language questions and exact technical terms.
🤖 Step 7 — Generate Answers with an LLM
At this point, your system can retrieve relevant chunks from the document collection.
If you are new to Retrieval-Augmented Generation, we recommend reading our guide:
It explains how retrieval and generation interact inside a modern RAG architecture.
The next step is answer generation.
To complete the workflow, we will send the retrieved context to a language model and ask it to generate an answer based only on that context.
This is the step that turns document retrieval into a real RAG application.
from openai import OpenAI
from dotenv import load_dotenv
import os

load_dotenv()

client = OpenAI(api_key=os.getenv("OPENAI_API_KEY"))
Now create a function that builds the prompt and sends it to the model:
def generate_answer(query, retrieved_chunks):
    context = "\n\n".join(
        [chunk["text"] for chunk in retrieved_chunks]
    )

    prompt = f"""
You are a helpful AI assistant.

Answer the user's question using only the context below.
If the answer is not available in the context, say:
"I don't know based on the provided documents."

Context:
{context}

Question:
{query}

Answer:
"""

    response = client.chat.completions.create(
        model="gpt-4o-mini",
        messages=[
            {
                "role": "user",
                "content": prompt
            }
        ],
        temperature=0.2
    )

    return response.choices[0].message.content
Now test the full generation step:
query = "What is Retrieval-Augmented Generation?"

retrieved_chunks = hybrid_search(query, top_k=3)

answer = generate_answer(query, retrieved_chunks)

print(answer)
Example output:
Retrieval-Augmented Generation is an approach that combines document retrieval with language model generation. The system first searches for relevant information and then uses that context to generate a more accurate answer.This is the core idea behind RAG.
Instead of asking the language model to answer from memory, we first retrieve relevant information from our documents and then provide that information as context.
This makes the final answer:
- more grounded
- more relevant
- easier to update
- less dependent on the model’s training data
When you build a RAG system in Python, this separation between retrieval and generation is the most important architectural idea to understand.
The language model generates the final response, but the retrieval pipeline controls what information the model can use.
🎯 Step 8 — Put Everything Together
You have now implemented every major component required to build a RAG system in Python.
The final step is connecting each component into a single workflow that takes a user’s question, retrieves relevant information, and generates an answer using a large language model.
The complete pipeline looks like this:
User Question
       │
       ▼
Generate Query Embedding
       │
       ▼
Semantic / Hybrid Search
       │
       ▼
Retrieve Top Document Chunks
       │
       ▼
Build Prompt
       │
       ▼
Large Language Model
       │
       ▼
Final Answer
Now combine everything into one function:
def ask_rag(query):
    retrieved_chunks = hybrid_search(query, top_k=3)
    answer = generate_answer(query, retrieved_chunks)

    return answer
The entire RAG system can now be used with just a few lines of code:
question = "What are the advantages of Retrieval-Augmented Generation?"

answer = ask_rag(question)

print(answer)
Example output:
Retrieval-Augmented Generation improves answer quality by retrieving relevant information before generation. This reduces hallucinations, allows knowledge to stay up to date, and provides responses grounded in your own documents.Although this implementation is intentionally simple, it demonstrates the complete RAG workflow used in many production systems.
From here, you can gradually improve the project by:
- loading PDF and Word documents
- using larger embedding models
- replacing FAISS with a production vector database
- adding metadata filtering
- implementing hybrid retrieval
- introducing reranking models
- deploying the application as an API
You have successfully built a RAG system in Python that loads documents, generates embeddings, performs semantic retrieval, and uses an LLM to answer questions based on retrieved context.
The next section explores how to take this basic implementation and turn it into a production-ready RAG application.
🚀 Where to Go Next
Congratulations! You have successfully built a RAG system in Python that can load documents, generate embeddings, retrieve relevant context, and produce AI-powered answers.
Although this project is intentionally simple, it includes the core components found in many production Retrieval-Augmented Generation applications.
From here, you can gradually improve your implementation and transform it into a scalable AI retrieval system.
📄 Support More Document Types
Instead of indexing plain text files, extend your application to process:
- PDF documents
- Microsoft Word files
- HTML pages
- Markdown files
- web content
- databases
Supporting multiple document formats makes your RAG system much more useful in real-world scenarios.
🗄 Upgrade Your Retrieval Infrastructure
FAISS is an excellent choice for learning and prototyping.
As your dataset grows, consider migrating to production-ready vector databases such as:
- Pinecone
- Weaviate
- Milvus
- pgvector
These platforms provide persistent storage, scalability, and advanced search capabilities.
⚡ Improve Retrieval Quality
Once the basic pipeline is working, experiment with more advanced retrieval techniques, including:
- metadata filtering
- hybrid search
- reranking
- query expansion
- parent-child retrieval
- multi-query retrieval
These improvements can significantly increase retrieval accuracy and answer quality.
🤖 Deploy Your Application
You can turn this project into a real AI application by building:
- a FastAPI service
- a web interface
- a chatbot
- an internal knowledge assistant
- a REST API
Deployment is the natural next step after you build a RAG system in Python and want to make it available to real users.
🎯 Final Thought
This tutorial provides a solid foundation for modern AI retrieval.
As you continue experimenting with larger datasets, better embedding models, and more advanced retrieval techniques, you’ll be able to evolve this simple project into a production-ready RAG application.hroughout this tutorial and gradually extend your project into a production-ready AI retrieval system.
❓ Frequently Asked Questions (FAQ)
Can I build a RAG system in Python without LangChain?
Yes. This tutorial demonstrates how to build a RAG system in Python using only a few essential libraries, making it easier to understand how each component works.
Why does this tutorial use FAISS instead of a vector database?
FAISS is lightweight, fast, and easy to set up. It is an excellent choice for learning and prototyping before moving to production vector databases such as Pinecone, Weaviate, or pgvector.
Which embedding model should I use?
This tutorial uses all-MiniLM-L6-v2 because it provides a good balance between speed and retrieval quality.
For production systems, you may want to evaluate larger embedding models depending on your data and performance requirements.
Can I use PDF or Word documents?
Absolutely.
This tutorial uses plain text files to keep the implementation simple, but the same workflow can be extended to PDF, Word, HTML, Markdown, databases, and many other document sources.
Is hybrid search required?
No.
Semantic search alone performs well for many applications.
Hybrid search becomes valuable when users frequently search for exact terms such as product names, model numbers, or technical identifiers.
How many document chunks should I retrieve?
There is no universal answer.
Many RAG applications start with retrieving 3–5 chunks, then adjust this value based on retrieval quality and the context window of the language model.
Is this implementation suitable for production?
This tutorial demonstrates the core architecture used by production RAG systems.
Before deploying to production, you should consider adding authentication, monitoring, caching, metadata filtering, reranking, and scalable vector storage.
🎯 Conclusion
In this tutorial, you learned how to build a RAG system in Python from the ground up.
Starting with simple text documents, you implemented every major component of a modern Retrieval-Augmented Generation pipeline, including document loading, chunking, embedding generation, vector indexing, semantic retrieval, hybrid search, and LLM-powered answer generation.
Instead of relying on large frameworks, you built each component step by step to understand how the entire system works behind the scenes.
🧠 What You Accomplished
By completing this tutorial, you have successfully built a RAG system in Python that can:
- load documents
- split documents into chunks
- generate vector embeddings
- build a FAISS index
- retrieve relevant information
- perform hybrid retrieval
- generate AI-powered answers
These are the same core building blocks used in many production AI retrieval systems.
🚀 Your Next Challenge
The project you’ve created is intentionally simple, making it easy to understand and extend.
As your skills grow, you can enhance it by adding:
- production vector databases
- reranking models
- metadata filtering
- document parsers
- web interfaces
- API endpoints
- monitoring and evaluation
Every improvement builds on the same architecture you’ve implemented in this guide.
🎯 Final Thought
Understanding Retrieval-Augmented Generation is valuable.
Building one yourself is even more valuable.
You now have a working foundation that you can expand into a production-ready AI application while continuing to explore more advanced retrieval techniques and modern RAG architectures.